Authentication
- Introduction
- The public API
- Additional API keys
- Managing tokens
- How to create a token
- How to invalidate a token
- REST-API
- Authenticate using a token
- Using API endpoints without tokens - the public API
- GraphQL
- Further reading
Introduction
Generally speaking, authenticating with Cockpit's API is pretty easy.
- Whenever you want to fetch data from any REST-API endpoint via HTTP request a token should be passed inside every request's api-key header value.
- In addition, it's REST-API endpoint, Cockpit also provides a GraphQL based API. Authenticating with the GraphQL API also requires a token to be passed.
In the following examples we use USR-b2a6ef408b69a2ea86ea065a6d2301a8b4a535bc as an example API key.
The public API
Bad public API configuration probably exposes data to the world wide web without restrictions. Even worse, it can result in having unauthenticated users delete or write data to Cockpit using the API.
The public API is Cockpit's way of providing access to data for unauthenticated clients. In some cases you may want to give all clients - even unauthenticated ones - access to assets, collections, singletons, pages or other data stored in Cockpit.
You can make this work by using the public API:
- Navigation to /system/api/public
- Select a Role
- Make sure to select an appropriate role, if not available
- create a custom role used by the public API only, so things don't get mixed up
- Click Save to save the changes
- Congratulations, your public API is now available with permissions from your selected role.
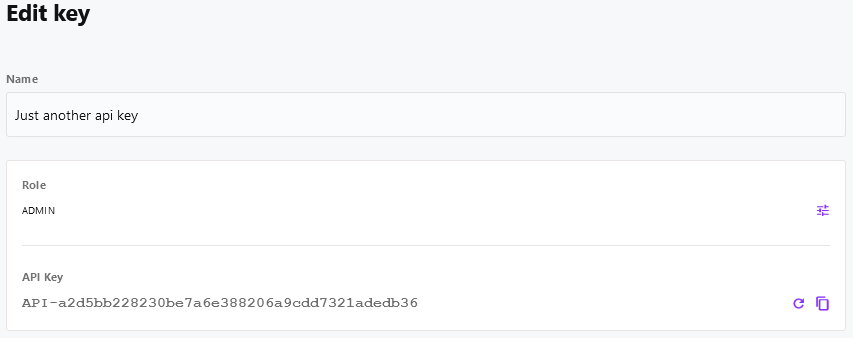
Additional API keys
In addition to user-based API keys Cockpit provides the option to create custom API keys, that do not belong to a user.
Foreach API key the following data has to be provided:
- name: the API key name, should make it easy to recognize the purpose of the API key
- role: the Role defines the permissions when accessing Cockpit's API with this key
- API-key: the unique API key token, ca be refreshed anytime
Example:
Managing tokens
How to create a token
- Login to your Cockpit installation at https://cockpit.example.com
- Navigate to your user's profile at https://cockpit.tld/system/users/user or the profile of the user you want to create a token for
- Create an API key if not available yet
- Copy the API key to your clipboard
- Click Update to save your user account changes
How to invalidate a token
- Login to your Cockpit installation at https://cockpit.example.com
- Navigate to your user's profile at https://cockpit.tld/system/users/user or the profile of the user you want invalidate a token for
- In the API Key section click Refresh to generate a new token
- The old token is now invalid
REST-API
Authenticate using a token
As soon as you have generated an API-token, using Cockpit's REST-API is pretty straightforward. Put the token inside the HTTP-request headers for every single request.
curl -X GET "https://cockpit.tld/api/pages/menus" \
 -H "api-key: USR-b2a6ef408b69a2ea86ea065a6d2301a8b4a535bc"
fetch('https://cockpit.tld/api/pages/menus', {
method: 'GET',
headers: {
"api-key": "USR-b2a6ef408b69a2ea86ea065a6d2301a8b4a535bc"
}
})
.then(response => response.json())
.then(response => console.log(response));Using API endpoints without tokens - the public API
In some cases you might expect Cockpit to provide data for your application without using an API-token. If you do, there's a couple of steps required to make it work.
In a nutshell, the public API works by configuring a user role to use in the public API (unauthenticated requests). As every role has a configurable set of permissions to your content, it usually takes just a couple of minutes to set everything up at your expectations. However, it still gives you control over Cockpit's data by restricting access for the public API.
- Login to your Cockpit installation at https://cockpit.example.com
- Navigate to the roles section at https://cockpit.tld/system/users/roles
- Click Add role
- Ensure to provide an appid (i.e. public), a suitable name (i.e. Public API) and set permissions at will
- Save the new role
- Afterwards go to the API section at https://cockpit.tld/system/api
- Click Public API
- Click No role set below the Role and choose your role (Public API if you followed our suggestion above)
- Click Save to finish the setup
- You can now use the API endpoints, the created role hast permission to
curl -X GET "https://cockpit.tld/api/pages/menus"fetch('https://cockpit.tld/api/pages/menus', {
method: 'GET'
})
.then(response => response.json())
.then(response => console.log(response));GraphQL
This section is still missing content. We are currently working on it.
Further reading
- If you want to read about Cockpit's Roles & Permissions system in depth, just have a look at this documentation's Roles & Permissions section.